- Logitech G15 rev.1 (реанимация)
- #1 Rainb0w
- #2 GeX
- #3 JesTerro
- #4 GalielO
- #5 Rainb0w
- #6 Юрка
- #7 Rainb0w
- #8 Serge
- #9 Rainb0w
- #10 Serge
- #11 PingwiN
- #12 Rainb0w
- #13 Serge
- Клавиатура logitech g15 ремонт
- Getting Started
- Rule Number One
- Opening it up
- Removing the silver face panel
- Removing the Keys
- Cleaning the keys
- Putting it back together again:
- Conclusion
- Share this:
- Like this:
- 84 Responses to How to disassemble and clean a Logitech G15 (Generation 2)
Logitech G15 rev.1 (реанимация)
#1 Rainb0w


#2 GeX
Super True Member

- Пол: Мужчина
- Город: Ленинский 110/2
#3 JesTerro
Super True Member

- Пол: Мужчина
- Город: Saint-P
- Интересы: When the going gets weird, the weird turn pro
When the going gets weird, the weird turn pro
#4 GalielO
Super True Member

#5 Rainb0w
#6 Юрка
Super True Member

- Пол: Мужчина
- Город: Светлановский пр.
- Интересы: nothing
Клавиатура снята с производства, и такую же купить проблематично. Принимаю советы по реанимации.
#7 Rainb0w
сочувствую
если есть навыки и прямые руки, то можно попробовать реанимировать по образу и подобию, как тут:
http://www.azbooki.r. name=4aser.txt
там рассматривается ремонт клавы от бука, вполне можно транспонировать алгоритм и методы на свежеусопшую..
#8 Serge

#9 Rainb0w
OFFTOP: после юзания клавиатур BTC с ноутбучными плоскими клавишами на клавы с высокими кнопками смотреть не могу, не говоря уже об использовать =)
Реально неудобно. Понятно, что дело вкуса, но почему нормальные производители вроде Logitech и Razer не делают клавиатур с такими кнопками?
У Logtech точно есть.
Заказал G11 отсюда http://www.elecon.sp. 5&goodsid=41980 завтра вечером буду дербанить, сниму все свежее.
P.S.: Пишу виртуальной клавиатурой.. %)
#10 Serge
#11 PingwiN
Super True Member

OFFTOP: после юзания клавиатур BTC с ноутбучными плоскими клавишами на клавы с высокими кнопками смотреть не могу, не говоря уже об использовать =)
Реально неудобно. Понятно, что дело вкуса, но почему нормальные производители вроде Logitech и Razer не делают клавиатур с такими кнопками?
+1 та же проблема — могу пользоваться только низкопрофильными клавами. А теперь из-за ноута привык к раздельным клавишам.
Проблема решилась очень просто http://store.apple.c. oduct/MB110LL/A — всем доволен. Мышь и «полевую» флешку втыкаю теперь только в клаву.
Единственное чего не хватает в клаве — адаптивной или регулируемой подсветки.
#12 Rainb0w
#13 Serge
Проблема решилась очень просто http://store.apple.c. oduct/MB110LL/A — всем доволен. Мышь и «полевую» флешку втыкаю теперь только в клаву.
Единственное чего не хватает в клаве — адаптивной или регулируемой подсветки.
У меня такая же есть, к Mac Mini подключена, не привык я к ней =(
Источник
Клавиатура logitech g15 ремонт
Anyone who’s had a computer for an extended period of time will know how disgusting a keyboard can get. The keys tend to develop a layer of grime on top, while accumulating dust, food and hair underneath.

I got sick of looking at all the grime on the Logitech G15 I use, and decided to pull it apart and clean it in the name of curiosity. And since disassembly guides for the keyboard aren’t easy to find, I decided to post my findings here.
So, shall we begin?
Getting Started
Firstly, a disclaimer. I’ll take no responsibility if your keyboard no longer works after reassembly. Any screw-ups are your problem to deal with. So if you’re not confident with pulling things to bits and putting them back together again, then don’t do it on anything valuable. This guide is only here to tell you what to expect upon opening it up, how to clean the keys, and in what order to put everything back in again.
It’s also worth mentioning that this guide doesn’t show how to open up the part that houses the screen and media playback buttons. Sorry, this guide won’t really help you if that’s what you’re looking to clean.
If you’ve decided to proceed (at your own risk), then let’s get started.
What you’ll need:
- A Logitech G15 Generation 2 Keyboard, preferably past its warranty.
- A set of small screwdrivers (Flathead and Philips).
- A small brush and a cloth for cleaning.
- A few hours (unless you’re really quick).
Rule Number One
Unplug the keyboard. Don’t be like one of my high-school classmates who tried to pull the motherboard out of a computer while it was still plugged in and running.
Opening it up
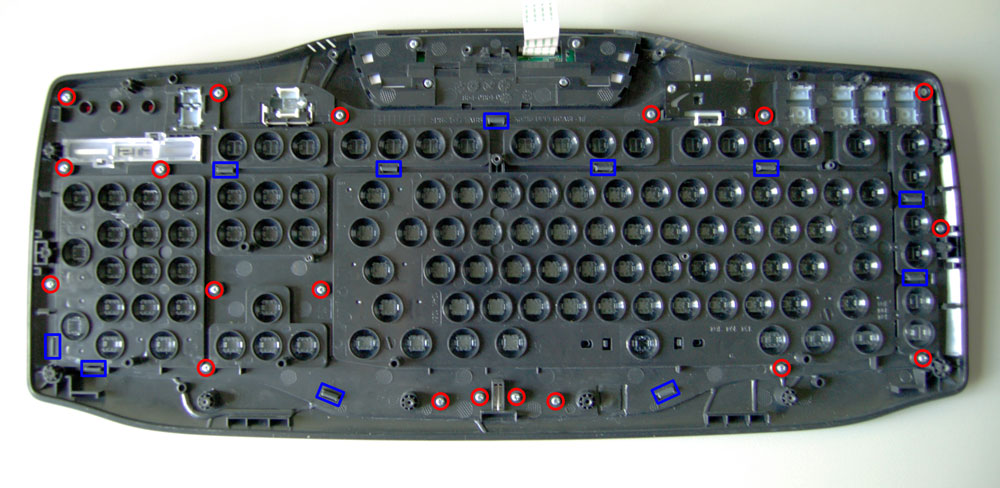
Turn the keyboard over and unscrew all the screws on the back. There should be 18 of them. Don’t worry about the keys, they will not (and can not) fall out.
Screws are circled in red. The hidden clips are marked with blue rectangles.
Don’t lose the screws. Put them somewhere safe, and count them to make sure you’ve got the right amount.

Got all 18 screws? Check.
You’ll notice that the keyboard is still holding itself together. There are four catches in the sides which will need to be unclipped. To do this, gently pry open the shell with a screwdriver at the top corner of the keyboard and work downwards. Be careful not to put the screwdriver too far inside the keyboard as you pry it open. It should require a bit of wiggling and gentle force to pop each clip open.
As you open the keyboard up, be careful that you don’t stress the ribbon still holding it together.

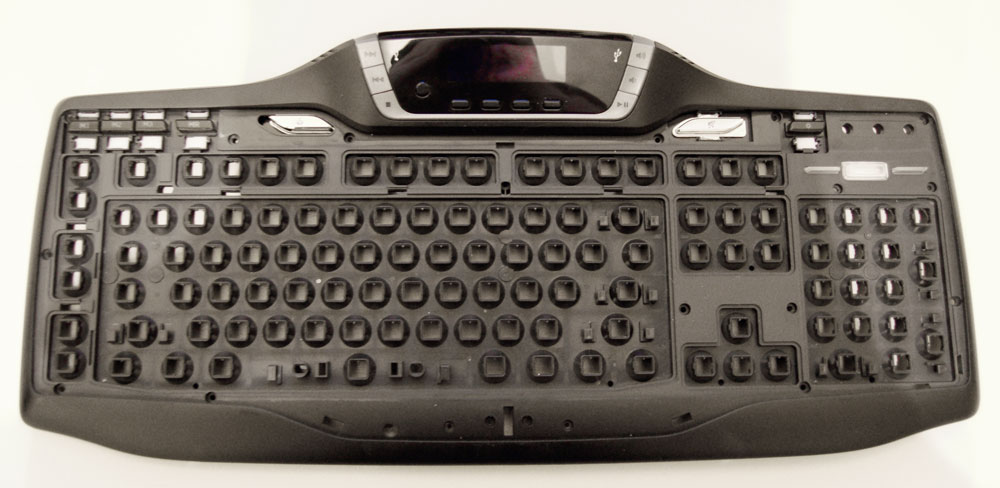
This is what it should look like inside.
Removing the ribbon is easy enough, but requires a bit of care. Firstly, find where the ribbon meets the the circuitboard of the bottom half of the keyboard, and locate the little black piece of plastic holding it in. Pull the little piece of plastic upwards, making sure you use the same amount of pressure on both sides. Once it comes up far enough, the ribbon should practically fall out.
Just make sure you don’t break that little black clip. I broke a clip like it in my Gen1 Nintendo DS, and it’s been causing me troubles ever since.

Pull the little black clip upwards to release the ribbon.
Now the two parts of the keyboard should be free! Give the rubber a quick brush off, and set that whole half of the keyboard aside.
Removing the silver face panel
The next step is to remove the silver panel on the face of the keyboard. This part tends to collect a lot of grime, so it’ll be easier to clean once it’s been removed.
Use a Phillips head screwdriver to remove the 19 screws that hold the faceplate on. In the photo below, they’re marked with red circles. And again, don’t worry about the keys falling out. They won’t.
The screws are marked by red circles, and the clips have blue rectangles.
Once all the screws are out, start opening the clips that hold the faceplate on. They are marked by blue rectangles in the picture above.
Remember to put the screws in a safe place, and make sure you don’t mix them with the other screws. They’re different sizes.

The 19 screws that hold the faceplate on. The Logitech plate is held on by two of the screws. Make sure you don’t lose them.
Now the faceplate should be free.

the freed faceplate.
Now is a good time to start cleaning it. Take a moist cleaning cloth and wipe the scum off the front and edges of the faceplate. I used water on the cloth, and it only took a little bit of rubbing to remove the buildup. Take note that cleaning chemicals may have unintended side effects, such as discolouration, or outright dissolving the plastic (unlikely, but possible). If you’re going to use chemicals, test them on the underside to make sure nothing bad happens before using them on the front.
Once the faceplate is clean, set it aside. It’s time to start popping the keys out.
Removing the Keys
As you’ve probably noticed by now, the keys will need to be popped out individually if you’re going to have a proper chance at cleaning them. To do it, you’ll need two small flathead screwdrivers (or similarly shaped objects). Take the screwdrivers and use them to push the clips on the keys inwards and downwards. Make sure you catch them as they come out.

A closeup of the process of key removal.
The only key I had difficulty with was the Space Key – It had four clips instead of two. I can’t give much advice on how to get it out, aside from being patient and persistent.
Also, you may notice that wider keys like the Shift and Enter keys have pieces of wire under them. They do not get in your way when taking the keys out, but when you put the keys back in, you’ll have to put the wire in place first.
If you keep at it, you’ll have all the keys out soon enough. Once they’re all free, it’s time to give them a much needed wash.
Cleaning the keys
The first thing I cleaned was not the keys, but the board itself. You’ve probably noticed by now that this is where all the junk in your keyboard hides. Take a brush and wipe all the junk out. Once it’s cleaned to your level of satisfaction, wipe all the exterior surfaces with the moist cloth. With a little bit of rubbing, all the caked on gunk should come right off.
If a keyboard has no keys, is it just called a board?
Once the “board” is clean, set it aside with the other main parts. It’s time to work on the keys.
Cleaning the keys is pretty much the same process as cleaning every other part of the keyboard. Just wipe the top and sides of the keys with a moist cloth. It’s also worth checking under the keys to see if there’s any hair or bits of junk under them. If there is, just brush it out.
You may notice that certain parts of the keys remain rough even after rubbing at them with the cloth. I suspect that this is all that remains of the original matte finish of the keys. In other words, it’s where the keys haven’t been polished smooth over time by your fingers.

This is how the keys are laid out. I think I might have OCD.
After I’d finished cleaning each key, I laid them all out on position on the desk. I found this pretty helpful when it came to putting it back together again…which coincidentally is the next thing to do, if you’re happy with how you’ve cleaned it out.
Putting it back together again:
Putting the keyboard back together is relatively simple. It’s basically like pulling it apart – except backwards.
- Push all the keys back into the keyboard. I’d recommend putting in any keys with wire backings first. Any keys that stick or jam are probably in the wrong place.
- Clip the silver face panel onto the keyboard, then screw it back on. Don’t forget about the Logitech plate. Click here if you can’t remember where to put the screws. Make sure the faceplate doesn’t jam any of the keys.
- Put the ribbon back into its socket, and push the small black clip down to fasten it in place.
- Make sure that the Windows Key lock switch is in the right place. You’ll find out soon enough if it isn’t.
- Fold the keyboard closed and squeeze the 4 clips at the sides of the keyboard to snap them shut.
- Put in all 18 screws. Look here if you need a reminder where to put them.
Well, that was a bit of an ordeal, but the result is definitely worth it.
Conclusion
This is the first guide of any sort that I’ve put online, so let me know what you thought of it. Likewise, if I missed anything, or inaccurately said something, let me know in the comments so I can fix it. Anyways, thanks for reading, and enjoy your clean new keyboard!
Share this:
Like this:
84 Responses to How to disassemble and clean a Logitech G15 (Generation 2)
Thanks dude, too bad this guide isnt on the first page when googling, cause this is better than anything else. Again, thanks
Thanks mate, glad to hear you found it helpful.
I’m looking at ways to get this higher up in the search ranks, but it may involve moving the site over into a DIY wordpress install. But either way, I’m glad you found it.
I’d like to buy one of these, but I use Dvorak and rearrange my keyboards. Are the F and J key clips identical to the rest of the keys?
From what I can tell of the photos, it looks like most of the letter keys are interchangeable. And since F and J are on the same row on a QWERTY layout, they should be the same height and shape as each other.
completely agree. i can’t wait to get into this legendary keyboard. (-owner since 2010)
Thanks, Great Guide 🙂
Thankgod for this guide. I was almost about to pop out the keys with a knife without opening the keyboard, like it’s possible on the old g15. :b
I’m done cleaning mine now, and it looks fine and new 😀
A tip for cleaning the keys: Instead of cleaning every single key, i just threw them all in a bucket with water and soap. 5 minuts later i took them on and let them dry for 15 minuts or so. Then they were totally clean. (:
Thanks for this great guide mate (:
Yeah, I considered doing the same initially, but I figured I should probably look into how it all works before going brute force. I’m glad my findings have been helpful to you 🙂
And soapy water would work well. Depending on how grimy everything is, each key may still need a wipe, but at least it’ll wipe off easily.
I soaked the keys in a solution of 1/3 lemon juice 2/3 water. Worked like a charm
Legend!!
This guide is awesome 🙂 So easy to follow, and now my G15 feels like new!! 😀
Thanks so much (:
Just what i needed! Thanks!
Great guide. Thanks again..
Thank you for this guide. My keys were sticking to the point that i could barely type any more. Now it is good as new.
Just an FYI (to those that still keep up on this) some later revisions of the G15 don’t use the little silver screws to keep the faceplate attached to the body. They have little plastic gray clips. (Come to think of it, I only have 8 silver screws: 6 for the LCD area, and 2 for the “Logitech” nameplate)
Once you push them back & down (7-8 of them, I believe) the silver faceplate should come off no problems.
Also, I found that using an old toothbrush with hot soapy water works wonders for cleaning around the key wells.
That’s interesting to know. The lack of screws would definitely make the disassembly and reassembly process much faster, but there’s not much left holding it on if the clips break.
And I reckon a toothbrush is brilliant for the job. I didn’t have a spare one around at the time, but if I did I would have used it.
Great guide, very detailed and easy to follow.
For the longest time i just plucked the keys out with a flathead and used a q-tip to clean what i could get to, but this seems to be a much better method.
Definitely going to be giving this a try.
Thanks poster.
I’m just through reading and now I’ll start cleaning. Glad for your OCD! I’ll repost when done on how easy it really was…hopefully!
Thanks for the time and trouble, regardless.
I guess I have a Generation 1 keyboard…it’s much more complicated and quite different from your instructions. Not being the owner of this, I wish the differences were more obvious just looking at the keyboard.
Thanks for the details…if you ever do this for Generation 1, I’ll be back!
Thank you for this guide. Have saved me many dollar$.. 😉
Awesome guide, cheers 🙂
Thorough and concise, great visual cues — made my job a snap, thanks!
Excellent guide, Spilled soda on my Gen 2 the other day and the shift key is sticking like crazy now. This guide ought to be a big help for getting the gunk off. Thanks again!!
Great guide!
I used pliers to push off keys though, I found it very easy and quick

This is the BEST guide ever! It was so helpful with all the photos and step-by-step…it was exactly what I was looking for and needed.
Thank you again and maybe a paypal link or better yet a BitCoin address where I can throw a few quid your way.
Thank you so much.
Thank you SO much for this in-depth article. I know a lot of time went into it, but it was beyond helpful for me. My keyboard was in serious need of cleaning and it’s been a long time since it’s looked and felt this good!
Tweezers also worked easily to get the keys off, btw. 🙂
Awesome. I’ve done similar to other keyboards in the past, but was a little concerned about disassembling my gen2 G15. Took me about an hour to take it apart/clean it/put it back together again.
If your G15 keyboard works fine, DON’T take it apart. A lot of people have screwed perfectly functional keyboards up following pointless tutorials like this. Once the LCD ribbon is ripped (It’s almost like paper), the LCD is completely useless and you will have to get a new keyboard. Likewise with the plastic underlay. A little scratch or some moisture and it is useless since some keys will never respond again. So before trying this, ask yourself “Is it really worth the risk?”
Your warning is definitely true. When disassembling anything, you have to be prepared for it to never work again. It’s why I put a disclaimer right at the start of the tutorial. Can’t take the chance? then don’t do it.
However, if you are willing to take the chance, then it’s good to go in knowing what to expect. A lot of people have screwed up things because no tutorials existed, and they got caught on something that they could have been pre-warned about. So as someone who likes to disassemble stuff, I feel I should do my part in helping other people who think the same.
I can’t say I did much with the plastic underlay, because it was pretty clean already (the rubber key-plunger sheet protected it well), but I can agree that damaging it might be a problem. In my case, I just gave it a quick brush with a dry cloth and set it aside, because it didn’t need any more than that.
As for the LCD Ribbon, it felt pretty solid, definitely not like paper. If it rips, it’s either because the ribbon is already dodgy, or you’re doin’ it very wrong. The probable point of failure around the ribbon is the little clip where it meets the circuitboards, not the ribbon itself. Either way, it’s good to be careful when working with these things.
Thank you for the guide.
I ran into a little problem putting the pieces back together. I have this one piece sitting around and not quite sure where it goes back to. I think it’s part of the LCD, but I just can’t remember which part of it. This is the a picture of the piece I’m talking about, I’d appreciated if someone could give me any hints. Thanks!

NVM! Figured out which piece that is!
do you know where this piece have to be?
Thanks for this guide, saved me a lot of time
Hey thanks for the guide, wouldn’t have been able to clean my keyboard without it. Cheers!
any chance of changing the led for the WASD keys? to a different color?
Unfortunately, it doesn’t seem very likely. The keys aren’t individually lit, so the best you could do is to black out the WASD keys by putting something opaque inside them.
Thanks so much for this post, I found it extremely helpful. I disassembled everything, put it in a big bucket of all-purpose cleaner (with the exeption of the little display, obviously), and let it soak for a while. Then I used some old small brush that came with my old electric razor to clean the peeks and gaps. After it dried I assembled it as described in your post, and it looks ever so shiney again. 🙂
Thank you so much man, I’ve been holding back from cleaning my KB because all the damn guides are for Generation 1. Glad I found this, its perfect! Many thanks again and again. Hope your work gets recognition 🙂
Ah yeah. Worked perfectly.
Thank you so much for the step by step disassembly!
Great guide, thanks for writing it up.
I’m cleaning my keys using hot water and dish soap in a large peanut butter jar. Soak, shake, clean!
Great guide, thanks for the time you put into this. Many people will find this useful, the orange g15 is a very popular keyboard.
good guide matey, probably saved me money for parts/replacement ^_^
Many thanks indeed for this great guide! These beasties sure do accumulate a lot of crud under the keys!! I have two suggestions that might assist other though. I used a pair of long nosed (5.5cm length) pliers to pop the keys and I worked out a reasonably simple method to get the space bar out. I left the space bar until last and then held the board upside down with number pad end towards me and pulling on the far end of the space bar with my right thumb and forefinger. Whilst keeping the tension on the space bar I then released the furthest clip with a flat-edges jewelers screwdriver in my left hand. I then popped the centre clip with my needle nosed pliers (left hand again) and then the closest clip with the jewelers screwdriver (and left hand again). I’m a leftie btw so right handers need to reverse the hands). Hope this helps.
Great guide. It was the best I’ve found for the orange g15. My keyboard looks brand new again, I forgot how good it looks. It takes quite a bit of time, but if it prolongs the life of your keyboard (which I’m sure it would) it is well worth it. Thanks again for putting this up.
Thanks for the guide! All nice and clean again. 🙂
I had just about given up on my G15 so many keys were sticking badly. Didn’t want to splash out on a new one. So im giving this a go. I got it apart fine other than the clips for the Silver plate being a PITA!! But nothing broken so far. Now for a scrub and the big test putting it back together.
ima t the point where i said stuff it. Things near useless now may as well try. if i break it i was up for a new one anyway. So well worth the risk. Dont think i would do this on a regular basis though only when its acting up.
Well i had some problems with that damned ribbon cable. Took 3 or 4 goes to get it right. but its all together and works great again. Feels like a new keyboard 🙂
Thanks, my keyboard looks and feels like new.
I have cleaned plenty of normal keyboards before but I was shocked by just how dirty mine was.
My next task is to change the LED colour for the keyboard, I reckon blue or white will light up much brighter than the default orange. Maybe I will add a board and replace the single colour with an RGB one and be able to programmatically control the board to change colour on the fly.
Your all retarded :). I just toss the plastic bits in my dishwasher and run a rinse cycle!
(dont wash regular or your melt that shiz!)
Thank you and great guide. Exactly what I was looking for.
Hi man, great guide but I need to clean between de membranes of the keyboard those that the rubber membrane press over. some of the soda get under those I clean with water damp napkinis but still some keys act bad. “m” result on “m5”, “n” is worst makes “n+ctrl+f” and windows key dont work at all. please help.
Some electronic component shops sell conducting silver paint, that you can apply with a small brush. Also, you may have luck (if you can work very precise) with simple aluminium foil and scotch tape to restore the lanes. Both methods are by no means a guarantueed success – moist (oxidizing) keyboard membranes have been a problem sinceever they were invented, but depending on your time, patience and budget it may be worth a shot.
NIce guide! thanks alot!
Helped a lot, thanks you SO MUCH 🙂
a note to who tries: BE CAREFUL with that mini display cable, it really is short! (and cut your nails)
I did open my g15 to clean it:
First time I did, I reassembled poorly and the bottom keys didn’t work. (leds were stuck in the keys)
Second time, I broke the cable of the mini display. Ok not a great loss anyway…
Third time, I cut a wire with one of my nails and the NJI9 keys stop working. 😦
Side note: the G110 is much easier to open and clean 🙂
My + key was left indented (pressed) after putting it back together. Its one of the longer keys with the longer clips. Pressing this key results in it staying depressed. Any ideas? Sam
Did you put the metal thingy back properly?
Just AWESOME. It was very useful!
Great job!!
This was absolutely amazing! My keyboard looks great. I have all the grime gone!
my A rubber was torn..and i replace it with brightness rubber by this tut..works like charm..
thanks man
Aaaaaaaaaaaaaaaaaaaaa
This guide is really helpful!
Just followed all the steps, easy as cake and my keyboard is as good as new! ❤ Thank you so much!
Thanks Brilliant Guide.. i have had one problem, my media and mute buttons stopped working, the five buttons under the display work fine, just (>>, Lapkritinis says:
Very detailed pictures – loved this. And my keyboard is like new 🙂
Thanks man was a perfect step by step! The hardesr part in it all wss to get the arrow keys back in right place 😉
and big thanks for the details around that nasty little cable connecting the kyboard to the lcd display, huge help there
keep up the good works and thanks for the gleaning advice! As im living with a cat i now have enough fur from my keyboard to construct a new kitten fur :p
I originally came here just for the pic for the keyboard now I wish I had looked this up b4 I even started to take the board apart would have made the process a lot faster great guide.
5 years after this gotten posted and it just helped me out of a (milk tea induced) jam. Thanks a lot.
Very glad I found your post. It’s a great walkthrough. Made the process easy.
Finally cleaned my keyboard after years of use it was full of gunk and cat hair. Now my keyboard looks like new!
Hey Wazzar. It’s been a few years since you wrote this. I hope you’re still fine.
Might be the first procedure you posted on the internet, but it’s not the first time you wrote. I remember “Description of a Process” in Technical Speech in college. You do a good job of remembering to put yourself in your audience’s shoes and anticipate what they’ll need.
I have clip-a-phobia. I’m afraid of those clips breaking if I try to pull them apart. However, no one has reported any nightmares with them, so maybe I should just pull and not be such a scaredy cat?
Also, about the ribbon connector. You showed just pulling the black tabs straight up. So there’s no locking mechanism that needs to be freed? For anyone else reading, the object of the game is to avoid pulling on the ribbon, because you don’t want to yank it out of its connector.
Also wondering if I can install one of those little LCD displays in my Y-RBN90? And maybe convert it from an automatic to a stick shift? Thanks.
Woops, I forgot to say that the Y-RBN90 is a different Logitech keyboard. But it looks like your procedure is going to match really closely. Will keep you informed. -n-
Doin’t worry about the clips.
The ribbon cables on the other hand are a little bit fragile, especially at the ends.
OK Greg. Then I’ll stop worrying about the clips.
I’ll be gentle on the ribbon cable connectors. Pull straight up using the black tabs, and check for proper alignment before pushing back on. They do look plenty miniaturized compared to your average ribbon connector.
Funnily enough, this may actually have been the first time I’d written something like this. I like to think I could relate to my audience because I was literally my own audience. At the time, there weren’t any existing guides, so I started disassembly with the mindset that I’d create my own. I’d read plenty of other guides by that point, so I had a subconscious understanding of the format, but the main goal was to create something that past-self would’ve found useful.
If I recall correctly, the black tabs actually were the locking mechanism. Pulling that tab up frees up the ribbon. They may have changed the tab mechanism on future boards though. Manufacturers do minor stuff like that from time to time.
As for your other questions, I don’t have the keyboard anymore (it moved out with my brother), so I don’t have the means to find out. I could always pick up a screwdriver set and go visit, but I somehow think he’d prefer his keyboard intact…
> They may have changed the tab mechanism on future boards though
I infer that the tabs that you dealt with were not really a problem. No stories or cautions about them breaking due to prying.
If this is the 21st Century, they probably replaced the tabs with something more brittle, if only to punish those consumers who try to repair their own devices.
Don’t tell your brother, but there are a bunch of G15 keyboards listed on eBay, at the moment. A new one for $208, but calm down — that includes shipping, ha ha. Bunch of others Used, but not too many close-ups of the lint (etc.) between the keys. Some without palm rests, others with.
Haha, how cynical. You’re probably right, assuming they haven’t just glued the thing.
Well, it’s pretty worn out by now (but still functional), so it probably wouldn’t go for all that much. Amusing to know though 🙂
> so it probably wouldn’t go for all that much
Oh, I don’t mean to suggest selling [the one your brother commandeered], but rather if you really love the G15, there are others out there you can get to fill the empty spot in your heart. Sometimes, the folks selling one have pretty convincing stories about theirs having been lightly used. Couple that with if they have a high percentage approval rating from previous customers, it helps assure they’re really telling the truth when they say it’s got “low miles.”
And if it really has low miles, you know how to make it like new, again. All you need is a big tabletop. And gentle with the ribbon cable.
And how about stealing a nylon stocking from someone (when they’re not looking), putting all the keys into it, spread them out into a thin layer — inside the stocking — on the top shelf of a dishwasher. (More chance of melting on the lower shelf.) I might let the dishwasher run for its first cycle with a little soap. When the first cycle is over and the dishwasher starts to drain, push the dishwasher to drain, immediately end, and turn off. Should take about 10 minutes from Start to Off. Then start the dishwasher again, run the first cycle a second time, this time without soap. That should rinse everything off pretty good. Maybe turn the stocking over halfway through. When the second first cycle is finished, the keys should be nice and shiny.
By then, all that’s left is to inspect all the nooks and crannies to assure my idea actually worked. But you’ll go through much fewer Q-Tips if you let the dishwasher take a crack at it, first.
Of course, if you get a keyboard that really has low miles, it might not need cleaning for a few years.
Epic guide. Still useful after all these years.
Источник