- UniFi — Обнаружение неисправностей Cloud Key и другие проблемы стабильной работы
- Введение
- Признаки нестабильной работы
- Решение
- Как сбросить Cloud Key
- Восстановление с помощью резервных копий
- Потенциальные причины и профилактика
- UniFi — Troubleshooting Offline Cloud Key and Other Stability Issues
- Symptoms
- Resolution
- 1. Reboot
- 2. Reset Cloud Key
- Reset Method 1: On the web browser
- Reset Method 2: Hardware Button
- Reset Method 3: SSH
- How to Restore from Last Working Backup
- Restore Method 1: Via UniFi Setup Wizard
- Restore Method 2: On the web browser
- Potential Causes and Prevention
- Cause 1: Power Outages/Interruptions
- Symptoms
- How to Prevent
- Cause 2: Disk Space
- Symptoms
- How to Prevent
- Cause 3: Maximum Database Limit
- Symptoms
- How to Prevent
- Other Causes
UniFi — Обнаружение неисправностей Cloud Key и другие проблемы стабильной работы
Ответ на вопрос
Примечание: Данная статья подразумевает использование UniFi Cloud Key, прошитого до последней стабильной версии.
Введение
Аппаратный контроллер UniFi Cloud Key представляет собой удобную платформу для запуска UniFi Controller. Он прост в установке и настройке, а также позволяет обойтись без постоянно включенного в сеть ПК (сервера) с фирменным программным обеспечением. Тем не менее, для должного уровня производительности аппаратный контроллер требует некоторого технического обслуживания и соблюдения рекомендаций по эксплуатации и настройке.
В данной статье будут рассмотрены методы исправления неполадок, а также способы обнаружения и устранения причин, их вызывающих.
Признаки нестабильной работы
Следующие признаки говорят о наличии проблем со стабильностью работы UniFi Cloud Key:
- Мигает белый светодиод, указывающий, что UniFi Cloud Key находится в статусе disconnected (отсоединен).
- Аппаратный контроллер отображается как offline (вне сети) на панели управления UniFi Management (https://unifi.ubnt.com).

- Пользовательский интерфейс Cloud Key недоступен по IP через браузер т. е. https://[cloudkey-ip]:8443/manage/.
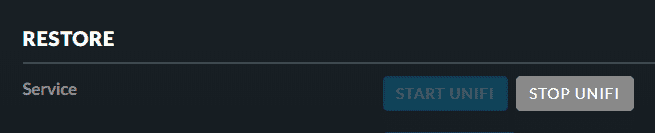
- UniFi Service в веб-интерфейсе отображается как не запущенный (https://, выберите опцию «Configure»>«Maintenance»>«Service»>«Stop» — светоиндикация UniFi Service потухнет, тем самым подтверждая, что устройство неактивно).
- UniFi сервис не запускается при нажатии на кнопку «Start UniFi».
Решение
Некоторые неполадки или сбои в UniFi CloudKey могут быть устранены простой перезагрузкой. По этой причине, рекомендуется первым делом перезапустить устройство. 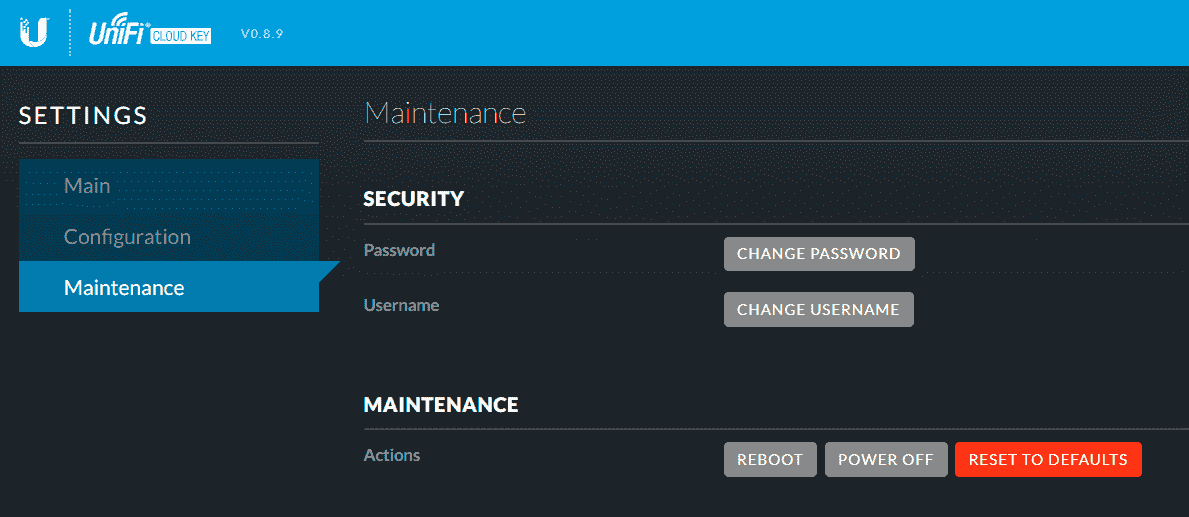
Сделать это можно следующим образом:
- Откройте Cloud Key в браузере, введя его IP-адрес в качестве URL: т.е. https://192.168.1.15.
- Вы можете получить предупреждение о небезопасности соединения от браузера. Нажмите “continue”
(в Chrome нажмите Advanced>”Proceed to [IP of Cloud Key](unsafe)” ). - Нажмите “Configure”.
- Войдите в систему с учетными данными UniFi Cloud Key, которые вы использовали во время первой настройки.
- Выберите вкладку «Maintenance».
- Перейдя по пути «Maintenance»>«Action», нажмите кнопку “Reboot”.
Если это не решило проблему, переходите к следующему абзацу.
2. Сброс Cloud Key
Практически любой сбой в UniFi Cloud Key может быть быстро устранен простым сбросом с последующим восстановлением настроек из резервной копии. Аппаратный контроллер позволяет упростить процедуру создания бэкапов на случай возникновения неполадок: если пользователь разрешит автоматическое резервное копирование, то устройство будет периодически создавать точки восстановления, которые при сбоях позволят быстро реанимировать UniFi CloudKey со всеми настройками.
Файлы бэкапов сохраняются на SD-карте, так что даже если доступ к аппаратному контроллеру отсутствует, сброс устройства позволит восстановить файлы из Auto Backup на накопителе. 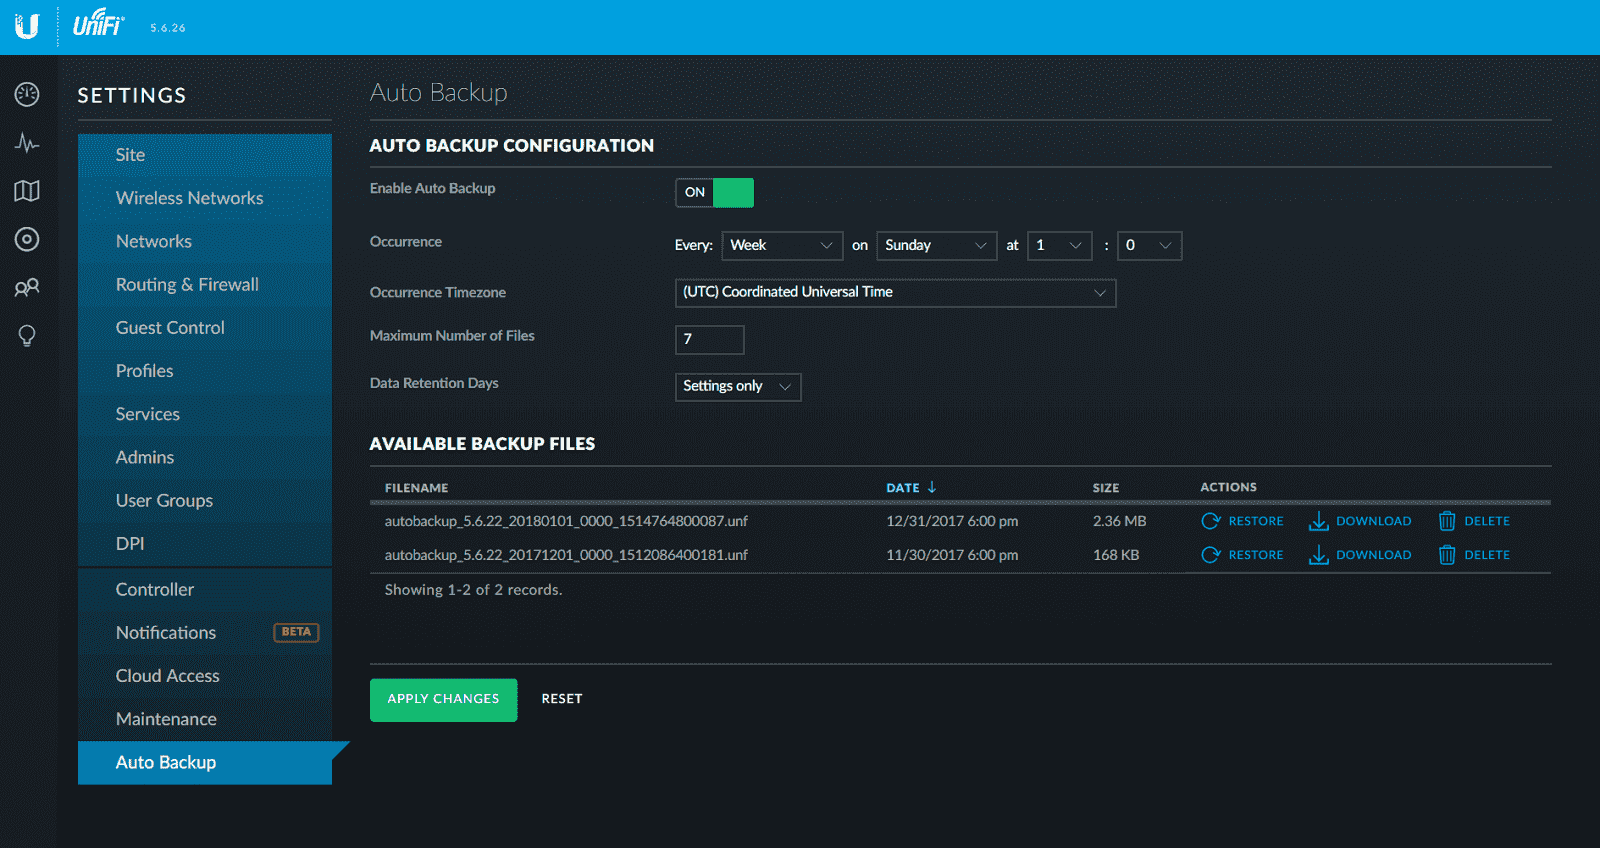
Рекомендуется разрешить автоматическое еженедельное создание резервных копий. Это позволит собрать достаточное количество вариаций бэкапов на случай серьезных неполадок.
Как сбросить Cloud Key
Внимание: Перед сбросом UniFi Cloud Key убедитесь, что резервные копии были сделаны. Для большей надежности, скопируйте их через пользовательский интерфейс или SSH на носитель до того, как устройство будет перезагружено. Помните, что сброс UniFi Cloud Key сотрет все настройки. Если резервная копия будет не доступна, их придется устанавливать заново.
UniFi Cloud Key может быть перезагружен следующими способами:
Метод №1: WebUI
- Откройте UniFi Cloud Key в браузере, введя его IP-адрес в качестве URL: т.е. https://192.168.1.15.
- Вы можете получить предупреждение о небезопасности подключения от браузера. Нажмите “continue”
(в Chrome нажмите Advanced>”Proceed to [IP of Cloud Key](unsafe)” ). - Нажмите “Configure”.
- Войдите в систему с учетными данными UniFi Cloud Key, которые вы использовали при настройке.
- Выберите вкладку «Maintenance».
- Нажмите «Reset to Defaults».
Если получить доступ к веб-интерфейсу аппаратного контроллера невозможно, существует еще несколько методов принудительного сброса.
Метод №2: аппаратная кнопка
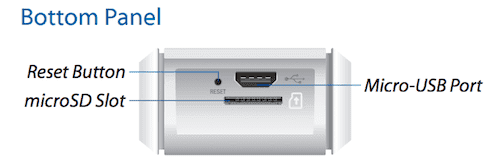
- С противоположной от Ethernet кабеля стороны найдете отверстие с надписью “Reset”.
- Вставьте скрепку или любой другой подходящий инструмент в отверстие, пока не почувствуете, что кнопка нажата.
- Удерживайте в течении 5 секунд, затем отпустите.
- Индикация светодиодов должна указать на то, что устройство перезапускается и проводит сброс настроек до заводских.
- При корректном завершении сброса, на UniFi Cloud Key должен загорется и не гаснуть белый светодиод.
- Используйте SSH клиент, например PuTTY (Windows), Terminal (MacOS), ssh (Linux).
- Подключитесь по IP адресу к аппаратному контроллеру.
- Авторизируйтесь через SSH используя сделанные данные из “Settings”>“Site”.
- После успешного входа в систему введите следующую команду и нажмите enter: ubnt-systool reset2defaults.
- Настройки Cloud Key будут сброшены до заводских.
Восстановление с помощью резервных копий
После успешного сброса, все настройки устройства будут приведены до заводских, что позволит устранить любую поврежденную базу данных или конфигурацию. Чтобы вернуть последние работающие настройки, нужно будет восстановиться с помощью имеющегося рабочего бэкапа:
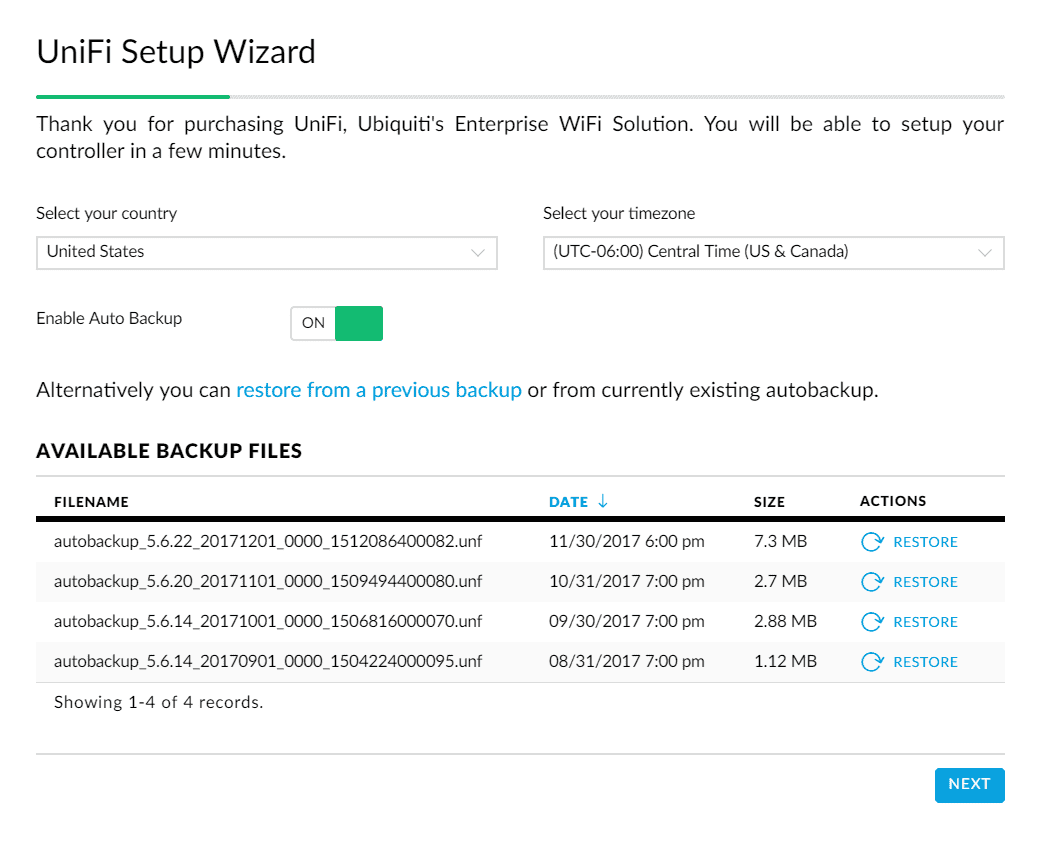
Метод №1: с помощью UniFi Setup Wizard
- Открыть веб-интерфейс UniFi Cloud Key по его IP адресу.
- Выбрать “Manage”.
- Мастер настройки UniFi представит вам существующие резервные файлы, хранящиеся на SD-карте.
- Выберите нужный файл с резервной копией и нажмите “Restore”.
Метод №2: с помощью WebUI
- Откройте браузер и введите URL, ассоциированный с UniFi Cloud Key hostname/IP.
- Вы можете получить предупреждение о небезопасном соединении от браузера. Нажмите “continue”
(в Chrome нажмите Advanced>”Proceed to [IP of Cloud Key](unsafe)” ). - Нажмите “Configure”.
- Зайдите под учетной записью по умолчанию:
Username: ubnt
Password: ubnt - Выберите вкладку «Maintenance».
- Нажмите «Stop UniFi», а как только соседняя кнопка «Start UniFi» станет активна, переходите к следующему шагу.

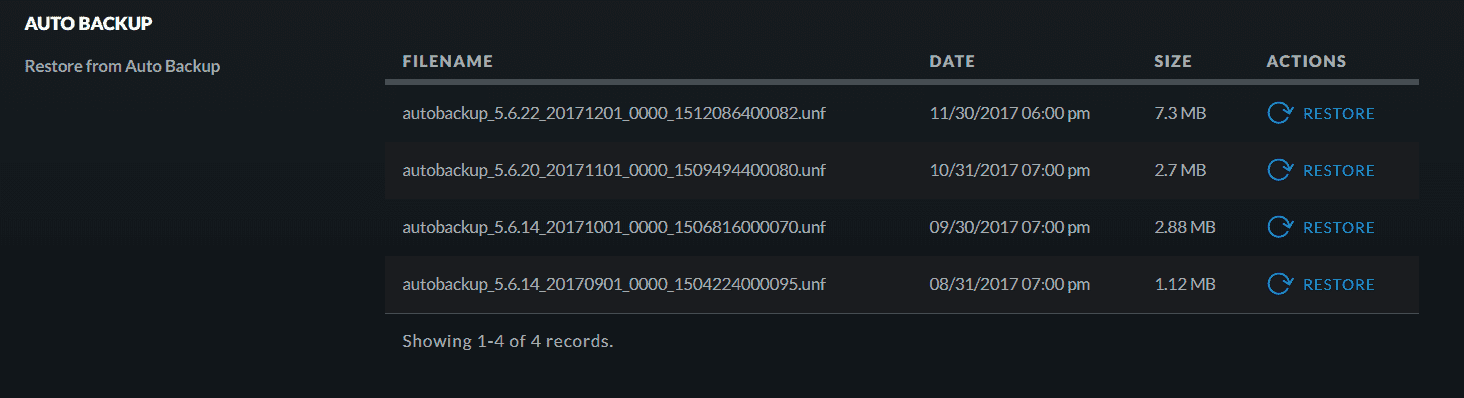
- В разделе «Autobackup» выберите самый свежий рабочий файл резервной копии и нажмите «Restore».
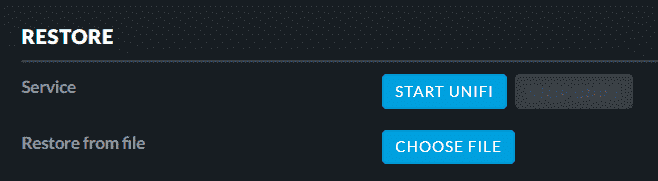
- Если же вместо этого у вас есть локальный файл для восстановления, рядом с пунктом «Restore from File», нажмите «Choose File».
Потенциальные причины и профилактика
Начиная с первого выпуска UniFi Cloud Key, его функционал значительно расширился, регулярные обновления прошивок позволяют не только добавлять новые свойства, но и поддерживать высокие показатели стабильности работы. В новых прошивках учитываются недочеты предыдущих версия и предлагаются решения для оптимизации работы, поэтому настоятельно рекомендуется следить за версиями и обновлять их по мере выхода.
Если же сбои UniFi Cloud Key не удалось устранить ни перезагрузкой, ни сбросом, и они регулярно появляются, необходимо определить источник проблемы. Чаще всего им являются:
Причина 1: Отключение питания/прерывание работы
Аппаратный контроллер хранит данные и файлы конфигурации в базе данных MongoDB. Даже в небольших сетях над базами данных регулярно выполняются различные операции. Если посреди такой операции произойдет сбой с подачей электричества, она не сможет завершится корректно. Это способно повредить данные в БД, что будет препятствовать нормальной, стабильной работе всей системы. (Внезапное выключение питания обязательно приведет к сбою MongoDB, ввиду его отличной(от других) организации — прим. перев.). В некоторых случаях, после отключения питания, UniFi Cloud Key может не запустить службу UniFi должным образом в связи с подобными ошибками в базе данных.
Если вы обнаружите, что аппаратный контроллер выключается из-за потери питания, хотя перебоев с электроэнергией не наблюдается, проверьте кабель Ethernet, используемый для питания устройства через PoE. В случае его неисправности — замените.
- Проблемы со стабильностью возникли после отключения/прерывания питания;
- Постоянные проблемы со стабильностью Cloud Key, не связанные с Ethernet кабелем;
Как предотвратить
- UniFi Switch или другое устройство с POE (которое питает Cloud Key) подключите к источнику питания с резервными аккумулятором, чтобы обеспечить бесперебойную работу при коротких отключениях электроэнергии.
- Подключите небольшой заряженный аккумулятор (например, PowerBank для зарядки мобильных телефонов) в Cloud Key через microUSB — это предотвратит его выключение при перебоях с питанием.
- Замените неисправный кабель Ethernet новым кабелем, если Cloud Key выключается даже в тех случаях, когда нет отключения питания.
- Применение кнопок Shutdown/Reboot в пользовательском интерфейсе более корректное действие, чем простое выдергивание и вставление питания.
UniFiCloud Key проектировался как компактное, доступное и простое в установке устройство. Это стало причиной относительно небольшого, по сравнению с сервером UniFi CloudKey, дискового пространства. В большинстве случаев это не является проблемой, однако в более крупных сетевых структурах, в которых подробные данные и архив резервных копий было решено сохранять, свободная память может закончиться. По этой причине желательно регулярно отслеживать использование диска в UniFi CloudKey.
- Показатели использования хранилища близки к 100%;
- UniFi Cloud Key отключается без предупреждения (дисковое пространство будет исчерпано и mongodb не сможет писать в базу данных дальше);
- Периодически проверять использование диска аппаратного контроллера с помощью “WebUI”>“Configure”>“Main”;
- Ограничить количество резервных копий, хранящихся на устройстве. Если требуется большое количество резервных копий/данных, переносить эти файлы в другое место, а затем удалять их из локального хранилища;
- Уменьшить продолжительность хранения данных в UniFi Controller, перейдя по пути “Settings”>“Maintenance”>“Data Retention”;
- Если дисковое пространство заканчивается часто, можно добавить карту microSD;
- Проводите регулярное сжатие базы данных в “Settings”>“Maintenance”>“Compact Database”;
- Удалите лишние резервные копии в “Settings”>“Auto Backup”.
Причина 3: Ограничения базы данных
Все контроллеры UniFi используют для своей работы базу данных MongoDB. Отличительной чертой UniFi Cloud Key является то, что устройство оснащено 32-битным CPU ARMv7, и, соответственно, способно работать только с MongoDB аналогичной разрядности. Версии MongoDB x86 имеют определенные ограничения, если сравнивать их с х64 экземплярами MongoDB, поскольку они могут поддерживать размеры базы данных примерно в 2 ГБ.
По мере увеличения сложности и масштаба сети, база данных UniFi Controller будет расти в размерах. В большинстве случаев, это проблемой не будет, так как UniFi Cloud Key позиционируется в качестве компактного, портативного решения для небольших сетей. Однако, учитывая 32-битное ограничение размера в аппаратном контроллере, при использовании в крупных сетевых структурах (от нескольких десятков AP/UniFi-устройств) его лимит памяти будет быстро исчерпан, что существенно скажется на функционировании.
- server.log указывает на ошибку, идентичную или аналогичную следующей:
‹inform_stat-10› ERROR dev — Error in DeviceManager.processStat() com.mongodb.WriteConcernException: < "serverUsed" : "127.0.0.1:27117" , "err" : "can't map file memory - mongo requires 64 bit build for larger datasets"` - Размер базы данных составляет около 2 ГБ
- Восстановление из резервной копии помогает до тех пор, пока не будет достигнут лимит.
Как предотвратить переполнение
- Убедитесь, что развернутых UniFi устройств не слишком много для Cloud Key;
- Если масштаб развертывания UniFi в Cloud Key становится слишком большим, попробуйте перейти на установку программного UniFi Controller на сервере с 64-разрядной ОС;
- Убедитесь, что размер ваших резервных копий не приближается к пределу 2 ГБ в “Settings”>“Auto Backup”;
- Уменьшите параметры сохранения данных, затем сожмите базу данных в “Settings”>“Maintenance”>“Compact Database”.
Источник
UniFi — Troubleshooting Offline Cloud Key and Other Stability Issues
This article will explain how to troubleshoot, resolve and prevent UniFi Cloud Key failures and stability issues.
Note: Before troubleshooting the stability issues, make sure to update your UniFi Cloud Key to the latest Official UniFi OS Console and UniFi Network application versions.
Symptoms
All of the following symptoms can indicate stability issues with your Cloud Key:
- Flashing white LED indicating the UniFi Cloud Key is disconnected.
- Cloud Key may show as Offline in UniFi Remote Access Portal (unifi.ui.com)
- The Cloud Key management UI may not be accessible via direct URL when typing the Cloud Key’s IP on browser: https://[cloudkeyip]:8443/manage/
- UniFi service shows as not running through the web application (https://, Select option Configure > Maintenance > Service > Stop UniFi will be grayed out indicating it is already offline)
- UniFi service will not start by clicking the button «Start UniFi».
Resolution
1. Reboot
As a first step, some Cloud Key issues can be resolved with a simple reboot. If you have not done this, do so now. This can be done by following these steps:
- Open the Cloud Key management portal in a browser by typing the IP address of the Cloud Key as URL: i.e. https://192.168.1.15
- You may receive a Privacy Error. Click continue.
- In Chrome, click Advanced > «Proceed to [IP of Cloud Key](unsafe)»
- Select Manage Cloud Key.
- Log in with UniFi Cloud Key credentials used at setup (username will be root). See our Related Articles below for credential questions. Open Settings > Hardware > and click on Reboot.

If this does not resolve the issue, then proceed to the next resolution.
2. Reset Cloud Key
Nearly every UniFi Cloud Key failure, can be quickly resolved by a simple Reset and Restore of a backup file. The Cloud Key has made it easy to maintain backups in case of any failures. Auto Backup, if enabled, will create periodic snapshots that can be restored to in the case of any failures.
These are stored on the SD card and even if the Cloud Key is unable to be accessed manually, a reset of the device will permit a restore of the Auto Backup files on the SD card. Auto Backup is configured in the Network application under Settings > Auto Backup.
To ensure that you have enough intermittent backups should anything happen, it’s recommended to have automated Weekly backups.
Follow the steps below to reset the Cloud Key:
Reset Method 1: On the web browser
- Open the Cloud Key management portal in the browser by typing the IP address of the Cloud Key as a URL: i.e. https://192.168.1.15.
- You may receive a Privacy Error, in Chrome, click Advanced > Proceed to [IP of Cloud Key](unsafe).
- Click Manage Cloud Key on the right side.
- Log in with UniFi Cloud Key credentials used at setup. See the Related articles section below for credential questions.
- Select the Settings tab.
- Open the hardware tab by clicking the + sign.
- Click FactoryReset.

If access to the Cloud Key’s management portal is not possible, use one of the following alternatives:
Reset Method 2: Hardware Button
- The reset button is at one end of the Cloud Key. See each model’s Quick Start Guide for the exact location.
- Insert a paper clip or similar object into the small hole until the button depresses.
- Hold for five seconds, then release.
- The LEDs should indicate the Cloud Key is restarting and being reset to default state.
- Once completed, the Cloud Key should show a steady white LED if this was done properly.
Reset Method 3: SSH
- Use an SSH client like Putty (Windows) or Terminal (macOS).
- Connect to the IP address of the Cloud Key.
- Authenticate using SSH credentials as previously configured. See this article for help on Cloud Key password disambiguation.
- Once you log in successfully, enter the following command then hit enter:
- ubnt-systool reset2defaults
- The Cloud Key will then reset to default.
How to Restore from Last Working Backup
Once your reset has completed successfully your Cloud Key should be in a factory default state, which will eliminate any database corruption/corrupted configuration of the Cloud Key. Now you are ready to restore from your last known working backup. Here are instructions on how to restore from a backup:
Restore Method 1: Via UniFi Setup Wizard
- Open the Cloud Key management portal in the browser by typing the IP address of the Cloud Key as a URL: i.e. https://192.168.1.15.
- You may receive a Privacy Error, in Chrome, click Advanced > Proceed to [IP of Cloud Key](unsafe).
- Select Unifi Network Launch.
- The UniFi Setup Wizard will present you with a couple of options setup from scratch or restore from backup. In this case, we will select restore from backup.
- Select which backup option you want. This could be a backup from the Micro SD card (My local backups) or a backup file you have stored on your PC (upload backup file) then just select the file and click Restore.


Restore Method 2: On the web browser
- Open the Cloud Key management portal in the browser by typing the IP address of the Cloud Key as a URL: i.e. https://192.168.1.15.
- You may receive a Privacy Error, in Chrome, click Advanced > Proceed to [IP of Cloud Key](unsafe).
- Click Manage Cloud Key.
- Login with default UniFi credentials (can be a combination of either one of these, depending on production date):
- Username: ubnt
- Password: ubnt
- Username: root
- Password: ubnt
- Go to the Controllers tab.
- Click the Stop UniFi button, once the Start Up Network button appears clickable and you opened the drop down menu «settings and maintenance for the UniFi Network controller» proceed to the next step.
- Click on Restore and you will get a menu of the available backups that you have on your Micro SD card.


Potential Causes and Prevention
Since Cloud Key Gen1 was released, a number of features have been added and improved via firmware to improve stability and prevent common issues. Because of this, it is always recommended that you upgrade your Cloud Key firmware to the most recent stable version, especially if you repeatedly encounter any stability issues.
If Cloud Key stability issues are not resolved with a reset/restore, or repeatedly come back, it is particularly important to identify and resolve the root cause. The majority of such reported issues are found to be a result of one of the following causes:
Cause 1: Power Outages/Interruptions
The Cloud Key stores data and Network application configuration in a MongoDB database. Even in small environments, there are ongoing database functions being performed at any given moment. If these database operations are interrupted as a result of a sudden power interruption, this can cause database corruption which will ultimately hinder the proper function of the Cloud Key. In some cases, after a power outage, the Cloud Key may be unable to start the UniFi service properly due to database errors resulting from the interruption.
If you find your Cloud Key is losing power frequently despite no power loss, you may also have a bad Ethernet Cable being used to power the device via PoE- replace the cable to resolve this.
Symptoms
- Stability issues arise after a known power outage/interrupted power.
- Persistent Cloud Key stability issues; testing with different ethernet cable fails to reproduce.
How to Prevent
- Power the UniFi Switch or other PoE supplying device up to a power source with battery backup to ensure that power remains uninterrupted in short power outages.
- Plug a small charged battery like those used for charging mobile phones into the Cloud Key via the micro USB port. This will prevent the Cloud Key from being shut off in a power outage from interrupted PoE.
- Replace faulty Ethernet cable with new cable if the Cloud Key loses power in cases where there is no power outage.
- Shutdown/Reboot Cloud Key gracefully using the button in UI rather than unplugging/plugging back in.
Cause 2: Disk Space
The Cloud Key was built for compact form, ease of install and affordability. With this comes less disk storage than you’d find on a server that would otherwise be running the Network application. In most environments, this will not become an issue and requires little consideration. However, in larger environments or configurations that have opted to retain more detailed data and a larger number of backups, disk space can become an issue. For this reason, it is good to monitor the disk usage on the Cloud Key regularly just to ensure that the disk space isn’t over-utilized.

Symptoms
- Storage Space Shows as close to 100% utilized
- Cloud Key will shut down the application service without warning as disk space is exhausted/MongoDB is unable to write to the database further
How to Prevent
- Periodically check the Cloud Key disk utilization through the WebUI > Configure > Main.
- Limit the number of backups stored on the Cloud Key. If longer retention of backups/data is needed, download these files then remove them from Cloud Key storage.
- Decrease the length of data retention in the Network application under Settings > Maintenance > Data Retention.
- Perform regular compacts on Database under Settings > Maintenance > Compact Database.
- Remove excessive backups under Settings > Auto Backup
Cause 3: Maximum Database Limit
All UniFi OS Consoles operate with the use of a MongoDB database. What’s unique about the Cloud Key Gen1 over most other consoles is that it has an ARMv7 32-bit CPU, and as such can only run 32-bit MongoDB. 32-bit MongoDB instances have a limitation over 64-bit mongo instances in that they can only support database sizes of approximately 2GB. See more info here.
As the complexity and scale of the UniFi management increases, the database will grow in size. As the Cloud Key Gen1 is geared towards smaller sites and portability/compactness, in most cases this will not ever be anything to worry about. However, given the 32-bit limit on size on the Cloud Key Gen1, if used in the largest environments (more than a couple dozen APs/UniFi devices), this limit will quickly be reached and prevent healthy function.
If you are unsure of whether your Network application should be using a Cloud Key or not, review the following guidelines: UniFi — Cloud Key’s Device Management Limit
Symptoms
- server.log indicates error identical or similar to the following:
- ERROR dev — Error in DeviceManager.processStat() com.mongodb.WriteConcernException: <«serverUsed«: «127.0.0.1:27117» , «err» : «can’t map file memory — mongo requires 64 bit build for larger datasets»`
- The database is close to 2 GB in size
- Restoring from a backup may work until the limit is reached again.
How to Prevent
- Make sure your UniFi deployment is not too large for the UniFi Cloud Key to handle. See here.
- If the scale of the UniFi deployment on Cloud Key is growing too large, consider migrating to a software install of the Network application on a server with a 64-bit OS.
- Verify the size of your backups is not approaching the 2GB limit users under Settings > Auto Backup.
- Reduce Data Retention Settings, then Compact Database under Settings > Maintenance > Compact Database.
Other Causes
If you encounter an issue not covered by one of the above scenarios, get help on our Community. This article will continue to grow thanks to user feedback.
Источник